Netgear Wireless N-Router is an excellent choice for Gamers and work from home purposes. The proposed some of the best state of the art features that are available on modern-day WiFi routers. Netgear itself as a brand needs no introduction.
Everybody knows about the robustness, features and quality of Netgear networking devices. The Netgear Wireless N-Router is no different. In this tutorial, we are going to have a look at the setup process of Netgear Wireless N-Router. We are going to set the device with the help of Netgear assistant.
But before starting the Netgear Wireless Router Setup process, let’s have a look at all the things that are handled with the Netgear Wireless N-Router in the box.
Box Contents:
Here are accessories that you can find with the retail pack of your Netgear Wireless N-Router:
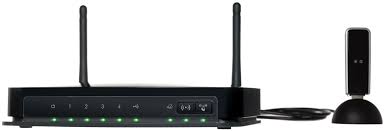
- Netgear Wireless N-Router: This is the router unit which is used to create a WiFi network at home. This is the main product, and it can be connected to a PC or laptop to provide wired or wireless network connectivity to the connected device.
- Power adapter: A power adaptor provides electricity to the Netgear Wireless N-Router. If you use a good quality power adaptor, you are likely to face issues with Netgear Wireless N-Router. It is always recommended by the company to use the original power adapter with the Netgear Wireless N-Router.
- Ethernet cable: This is in RJ-45 male-male cable which is used to connect the WiFi router with the PC or laptop. This is required only for the initial setup stage and can be removed if you plan to no use the wired connection at your office or home.
- Quick setup guides for the Netgear Wireless N-Router: This is a user manual which is provided for those people who do not have access to the internet or are trying to set up the device by themselves. If you follow this guide closely, you will not need the quick setup guide.
Hardware connection for the Netgear Wireless N-Router
- If you’re using the modem to connect to the internet, turn it off. Next up, remove the power adaptor from the modem.
- Then connect an ethernet cable between the modem and Netgear Wireless N-Router. Make sure that you plug the ethernet cable in the yellow board of Netgear Wireless N-Router. The yellow port on the Netgear Wireless N-Router is for signal input.
- Connect another internet cable between the WiFi routers output port and the PC/laptop’s ethernet port.
- Once you have plugged in everything, connect the power adaptor provided with the box to the Netgear Wireless N-Router and turn everything on.
With this step, you have completed the hardware connection of the Netgear Wireless N-Router successfully.
It’s time to move on to the software setup now.
Software setup of the Netgear Wireless N-Router
Next, we’re going to access the installation assistant of Netgear that is available on routerlogin.net website. You will be able to understand what we’re trying to explain as you continue reading the article.
- After plugging in the devices and turning them on, you have to wait for around one minute before the router completes the initialisation process before proceeding.
- Once the Netgear Wireless N-Router has completed the initialisation process completely, open a web browser like Google Chrome, Mozilla Firefox or Microsoft Edge from your Windows PC and visit http://routerlogin.net. If you’re using an Apple device, open Safari Browser and visit the link mentioned above.
- For maximum security, every Netgear device comes with a unique SSID and password combination, which is different for all products with the same model numbers.
- Once you are into the website http://routerlogin.net, you have to set the type of internet connection that you are using at your home or office. The most common type is PPPoE, but you have to confirm this with your internet service provider or your geeky friends.
- Before the set up ends, you will have to enter a new SSID and password for the Netgear Wireless N-Router. Do remember both the credentials because you will not be able to access the internet through your wireless devices if we do not remember the SSID and password.
- Finally, you have to set a user ID and password for http://routerlogin.net to prevent unauthorised access to the control panel.
- Do not share the user ID and password of the administrative control panel of Netgear Wireless N-Router with anyone to protect your private network’s security.
You can also check out our article on How Do I Set Up My Arlo Go Camera? This article explains the setup process of Arlo Go cameras. This article can prove extremely useful for those who are planning to install a wireless security camera using a local WiFi network.
During the setup process if you feel that something is not going right, contact Netgear customer service at any time and get your problem solved at the earliest.